이전에도 vue를 이용해서 캘린더를 만드는 것을 했었는데요.
캘린더에 기능을 조금 추가하고, typeScript를 사용하려고합니다!
Vue2로 제작 후에는 Vue3로 마이그레이션 하는 과정까지 해보려고 합니다.
또한 그동안은 optionAPI를 사용하여 개발을 했었는데 compositionAPI를 사용해보려고 합니다.
compositionAPI 란 컴포넌트 로직을 유연하게 구성할 수 있는 API 모음으로 로직의 재사용성과 가독성을 높여준다고 합니다.
optionAPI의 경우는 data, methods, computed등 각각 로직이 흩어져 있지만 compositionAPI의 경우 로직이 모아지게 됩니다.

좀 더 자세한건 저도 공부해서 블로그에 정리하도록 하겠습니다!
이 블로그 글 또한 직접 제작하면서 정리하기 때문에 깔끔하지 않을수 있습니다.
완성 후 정리하도록 하겠습니다!
추가 기능
- 일정 추가
- 일정 삭제
우선 달력의 모양을 만들어 주도록 하겠습니다.
그전에는 테이블을 사용했는데 이번엔 그리드를 이용해서 레이아웃을 잡아주도록 하겠습니다!
1. 가볍게 레이아웃 잡기
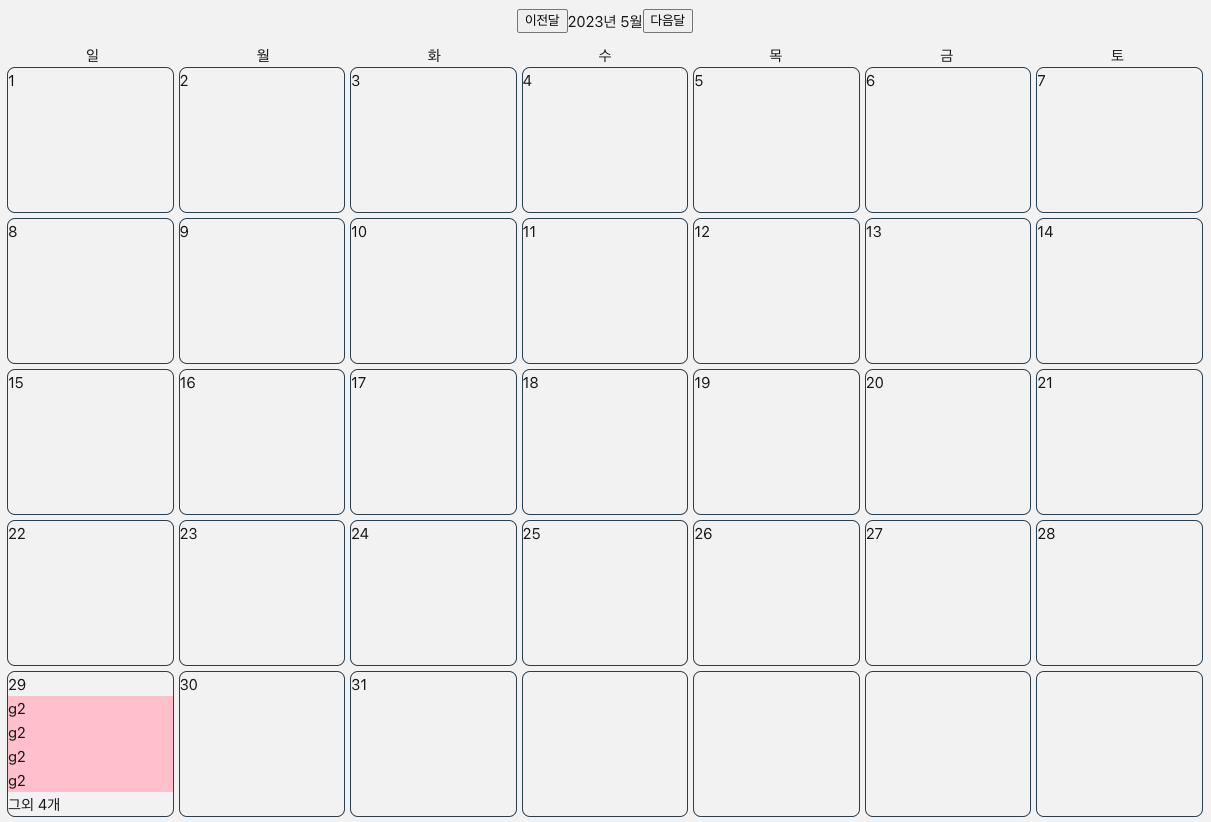
우선 가볍게 레이아웃을 잡아줬습니다!
이전 캘린더에서는 테이블을 사용했기때문에 주를 분리해주기 위해서 js로 한번 더 데이터를 수정하는 과정을 거쳤었는데요.
grid를 사용하면 불필요한 코드를 줄일 수 있습니다.

.calender-container {
  background: #f2f2f2;
  color: #181818;
  padding: 10px;
  display: flex;
  flex-direction: column;
  gap: 10px;
}
.calender-container .calender-header {
  display: flex;
  justify-content: center;
  align-self: center;
}
.calender-container .calender-body {
  flex-grow: 1;
}
.calender-container .calender-body .week {
  grid-column: 1/8;
  display: grid;
  grid-template-columns: repeat(7, 1fr);
  text-align: center;
}
.calender-container .calender-body .days-container {
  display: grid;
  grid-template-columns: repeat(7, 1fr);
  grid-auto-rows: 15vh;
  gap: 5px;
}
.calender-container .calender-body .days-container .days {
  border: 1px solid #2c3e50;
  border-radius: 8px;
  padding: 10px;
}
주요 css 속성
grid-template-columns
repeat는 반복되는 값을 자동으로 처리할 수 있는 함수입니다.
7을 기준으로 같은 비율로 반복하겠다 라는 의미입니다.
gird-auto-rows
행의 개수가 늘거나 줄어도 일정한 값을 적용받게 됩니다.
두 주요 속성 덕분에 모든 행열이 같은 크기의 값을 가지게 되었습니다!
2. 기본 기능 구현하기
	daysList.length = 35;
  currentDayInfo.currentDays = daysList;
달력 앞에는 unshift로 빈 날짜를 넣어줬지만 뒷쪽 빈 요일들은 날짜들의 배열의 길이를 35로 바꿔주는걸로 해결했었는데 여기서 이슈가 있었습니다.
2023.4월달 처럼 6주로 표현되어야 할 때에 날짜가 다 보여지지 않는 이슈입니다.
해결하기 위해 배열의 길이를 7로 나누었을때 딱 떨어지지 않으면 뒤쪽에 부족한 날짜만큼을 추가해주는 코드를 추가했습니다.
<script setup lang="ts">
import AtomButton from "@/components/Atom/button/AtomButton.vue";
import { reactive } from "vue";

const toDate: Date = new Date();
const weekDay: ReadonlyArray<string> = ['일','월','화','수','목','금','토'];
interface currentDay {
  year: number;
  month: number;
  day: number;
  currentDate: number;
  currentDays: (number | null)[];
}
const currentDayInfo: currentDay = reactive({
  year: toDate.getFullYear(),
  month: toDate.getMonth(),
  day: toDate.getDay(),
  currentDate: toDate.getDate(),
  currentDays: [],
});
const daysOfMonth = (year: number, month: number): void => {
  //한번만 실행되는 코드 합친 부분
  const startDayOfMonth = new Date(year, month, 1).getDay();
  const lastDateOfMonth = new Date(year, month + 1, 0).getDate();
  const daysList: (number | null)[] = Array.from(
    { length: lastDateOfMonth },
    (v, i) => i + 1
  );
  for (let i = 0; i < startDayOfMonth; i++) {
    daysList.unshift(null);
  }
  // 배열의 길이가 7로 나누어 떨어지지 않을때 실행될 코드
  if(daysList.length % 7 !== 0){
    daysList.length = daysList.length + (7 - (daysList.length % 7));
  }
  currentDayInfo.currentDays = daysList;
};
daysOfMonth(currentDayInfo.year, currentDayInfo.month);

const changeMonth = (val: number): void => {
  toDate.setMonth(toDate.getMonth() + val);
  currentDayInfo.month = toDate.getMonth();
  currentDayInfo.year = toDate.getFullYear();
  daysOfMonth(currentDayInfo.year, currentDayInfo.month);
};
</script>

<template>
  <main class="calender-container">
    <div class="calender-header">
      <AtomButton @click-btn="changeMonth(-1)">이전달</AtomButton>
      <div class="calender-title">
        {{ currentDayInfo.year }}년 {{ currentDayInfo.month + 1 }}월
      </div>
      <AtomButton @click-btn="changeMonth(1)">다음달</AtomButton>
    </div>
    <div class="calender-body">
      <section class="week">
        <div v-for="day in weekDay" :key="day">{{ day }}</div>
      </section>
      <section class="days-container">
        <div
          class="days"
          v-for="(day, idx) in currentDayInfo.currentDays"
          :key="idx"
        >
          {{ day }}
        </div>
      </section>
    </div>
  </main>
</template>
이렇게 기본적인 기능 구현을 했지만, 제가 만드려는 캘린더는 일정을 추가하고, 보여주고, 삭제하는 부분이 있기 때문에 배열 오브젝트형식으로 바꿔줘야합니다. 또한 달력을 넘기더라도 등록했던 일정이 사라지지 않게도 해줘야 합니다.
지금부터 조금씩 코드를 수정해 보도록 하겠습니다.
3. 데이터 타입 변경, 현재 날짜 표시하기
기본 기능을 구현할때는 currentDayInfo로 데이터 관리를 한번에 해줬었는데요!
관련된 데이터만 묶어 주었습니다.
또한 데이터를 입력해주는 for문이 총 세번 사용이 되서 함수 정의해 줬습니다.
또한 클래스를 바인딩하여 오늘 날짜와 달력에 있는 fullday가 같으면 currentDay 클래스가 추가 됩니다.
<script setup lang="ts">
import AtomButton from "@/components/Atom/button/AtomButton.vue";
import { onMounted, reactive, ref } from "vue";

const getDateInfo: Date = new Date();
const weekDay: ReadonlyArray<string> = [
  "일",
  "월",
  "화",
  "수",
  "목",
  "금",
  "토",
];

const currentDate = ref<string>(
  getDateInfo.toLocaleDateString("ko-KR", {
    year: "numeric",
    month: "numeric",
    day: "numeric",
  })
);
interface yearMonthDayType {
  year: number;
  month: number;
  day: number;
}
const currentYearMonthDay= reactive<yearMonthDayType>({
  year: getDateInfo.getFullYear(),
  month: getDateInfo.getMonth(),
  day: getDateInfo.getDay(),
});
interface scheduleType {
  time: string;
  detail: string;
}
interface dayInfoType {
  fullDay: string;
  schedule?: scheduleType[];
}
interface dayOfMonthType {
  day?: number | null;
  dayInfo?: dayInfoType;
}

const dayOfMonth = ref<dayOfMonthType[]>([]);
const daysOfMonth = (year: number, month: number): void => {
  const startDayOfMonth = new Date(year, month, 1).getDay();
  const lastDateOfMonth = new Date(year, month + 1, 0).getDate();
  repeatAddCurrentDays(startDayOfMonth, null);
  repeatAddCurrentDays(lastDateOfMonth);
  const currentDaysLength = dayOfMonth.value.length;
  if (currentDaysLength % 7 !== 0) {
    repeatAddCurrentDays(7 - (currentDaysLength % 7), null);
  }
};
const repeatAddCurrentDays = (untilNum: number, value?: null): void => {
  if (value !== null) {
    for (let i = 0; i < untilNum; i++) {
      dayOfMonth.value.push({
        day: i + 1,
        dayInfo: {
          fullDay: `${currentYearMonthDay.year}. ${currentYearMonthDay.month+1}. ${i + 1}.`,
        },
      });
    }
  } else {
    for (let i = 0; i < untilNum; i++) {
      dayOfMonth.value.push({
        day: null,
      });
    }
  }
};
const changeMonth = (val: number): void => {
  getDateInfo.setMonth(getDateInfo.getMonth() + val);
  currentYearMonthDay.month = getDateInfo.getMonth();
  currentYearMonthDay.year = getDateInfo.getFullYear();
  dayOfMonth.value = [];
  daysOfMonth(currentYearMonthDay.year, currentYearMonthDay.month);
};
// vue 생명주기
onMounted(() => {
  daysOfMonth(currentYearMonthDay.year, currentYearMonthDay.month);
});
</script>

<template>
  <main class="calender-container">
    <div class="calender-header">
      <AtomButton @click-btn="changeMonth(-1)">이전달</AtomButton>
      <div class="calender-title">
        {{ currentYearMonthDay.year }}년 {{ currentYearMonthDay.month + 1 }}월
      </div>
      <AtomButton @click-btn="changeMonth(1)">다음달</AtomButton>
    </div>
    <div class="calender-body">
      <section class="week">
        <div v-for="day in weekDay" :key="day">{{ day }}</div>
      </section>
      <section class="days-container">
        <div class="days" :class="{currentDay : currentDate === day.dayInfo?.fullDay}" v-for="(day, idx) in dayOfMonth" :key="idx" >
          {{ day.day }}
        </div>
      </section>
    </div>
  </main>
</template>

<style>
.calender-container {
  background: #f2f2f2;
  color: #181818;
  padding: 10px;
  display: flex;
  flex-direction: column;
  gap: 10px;
}
.calender-container .calender-header {
  display: flex;
  justify-content: center;
  align-self: center;
}
.calender-container .calender-body {
  flex-grow: 1;
}
.calender-container .calender-body .week {
  grid-column: 1/8;
  display: grid;
  grid-template-columns: repeat(7, 1fr);
  text-align: center;
}
.calender-container .calender-body .days-container {
  display: grid;
  grid-template-columns: repeat(7, 1fr);
  grid-auto-rows: 15vh;
  gap: 5px;
}
.calender-container .calender-body .days-container .days {
  border: 1px solid #2c3e50;
  border-radius: 8px;
  padding: 10px;
}
.currentDay{
  position: relative;
  color: #FFF;
  z-index: 2;
}
.currentDay::before {
  z-index: -1;
  width: 25px;
  height: 25px;
  background: #4fb995;
  display: block;
  position: absolute;
  top: 10px;
  left: 1px;
  content: "";
  border-radius: 50%;
}


@media (max-width: 520px) {
  .days-container {
    grid-auto-rows: 0.4fr;
  }
}
</style>
'Vue' 카테고리의 다른 글
| [Vue 2]캘린더 만들기 (2) | 2023.02.01 |
|---|---|
| [Vue 2] vue-router 설정하기 (0) | 2023.01.30 |
| [Vue 2] axios 모듈화 하기 (0) | 2023.01.03 |
| [Vue 2] vuetify icon custom 하기 (0) | 2022.09.21 |
| [Vue 2] vuetify v-date-picker custom 하기 (0) | 2022.09.20 |